Wednesday, 9 November 2016

Noel

Well I am back from my amazing weekend with Anna-Marie Designs.  This has to be one of the best organised workshops I have been to  Our first project was a card which incorporated some MDF items with the Noel and the deer. 


We started by taking a piece of white card where we roughly brushed on some Viva Chalky Paint (smokey blue) which was then followed by stencilling.  We then used some white chalky paint to add some additional stamp detail in the corners.  The deer was also painted in the smokey blue paint, once dry we used a layer of crackle glaze, dried again and then added some white chalky paint and then let for the paint to crackle.  I didn't use enough of the crackle glaze to get a good crackle but I was happy with what I produced!

Finally we distressed inked the background card and  distressed it with scissors.  This was followed by making up the flower and leaves, inking and shaping them.  The flower was then edged with 3d Schnee and crushed ice crystals.

The final part was to assemble the card which involved using some natural fire to add some dimension and additional interest to the back of the card.
We used lots of embellishments to add interest to the card and I have to say I was very pleased with the finished product.

All items were supplied by Anna-Marie and are available from her website.  I would thoroughly recommend attending one of these creative weekends as I really enjoyed it and you get really pampered into the bargain!

There are lots of other projects that I will share over the coming weeks -  I really cannot make up my mind which one I like most as they were all fabulous!

With love and crafty hugs

Ginny xx

Thursday, 3 November 2016

Steampunk Canvas

Well I promised I would share the canvas I did with Sheena last weekend, so here it is!


It definitely looks better in real life than it does in the photo's.  We started by cutting all the different elements we wanted to use on the canvas, which we then arranged onto the canvas. 


As there was a lot of layering I took a photo of my arrangement before taking it all off and sticking them down!

Once they were stuck down we then put a layer of gesso down across the whole canvas, including the sides.
Once this was done and it had dried we then went to work on adding cover to the canvas.  We used the Brights from the Aqua


Tints range and I primarily used the red, green and teal colours.  The tints were watered down and mixed together and then randomly painted onto the canvas, excess was wiped away with a baby wipe and this also helped to merge the colours together and add shading.  Once I was happy with the background I then watered down some of the tints even more and dribbled then down the canvas and they pooled around the elements that had been gesso'd (not sure that's a word!) down.

The extra cogs were coloured using Pebeo Gilding Wax before arranging them on the canvas.  Next we worked on the flower elements and the dragonfly.  We used Pebeo Texture Gel which had sand in it to add some extra texture to the flowers and dragonfly and then dried it carefully.  We then added the teal aquatints and it was interesting to see how this changed the look with the texture gel.  Once this was dried we added additional gilding wax to give a verdigris effect. 

Whilst the cardstock was still wet we played with the shaping of the dragonfly and flower to add dimension.

A small amount of gilding wax was added to the edge of the canvas and also to some parts of the gesso'd cogs to pick up some of the detail. Then we finished it off by adding the wording and calendar.

I have to say that I really enjoyed doing this and think it is something I will do again.  I believe Sheena did a version of this on Hochanda last week, so if it looks familiar that is why!

The products used are as follows:

10" x 8" Art Box canvas
White Gesso
Pebeo Gilding Wax - King Gold & Renaissance
Pebeo Texture Gel
Aqua Tints Brights range
Sheena Douglass Time Traveller Range & Dragonfly Dance

I hope that I will have something different, yet again, to share with you!  I am attending a weekend workshop this weekend, with Anna-Marie Designs.  That should be so much fun and I get to stay in a beautiful hotel in the Cotswolds too ;-)

I hope you are all having a good week, until next time ....

With love & crafty hugs

Ginny x


Saturday, 29 October 2016

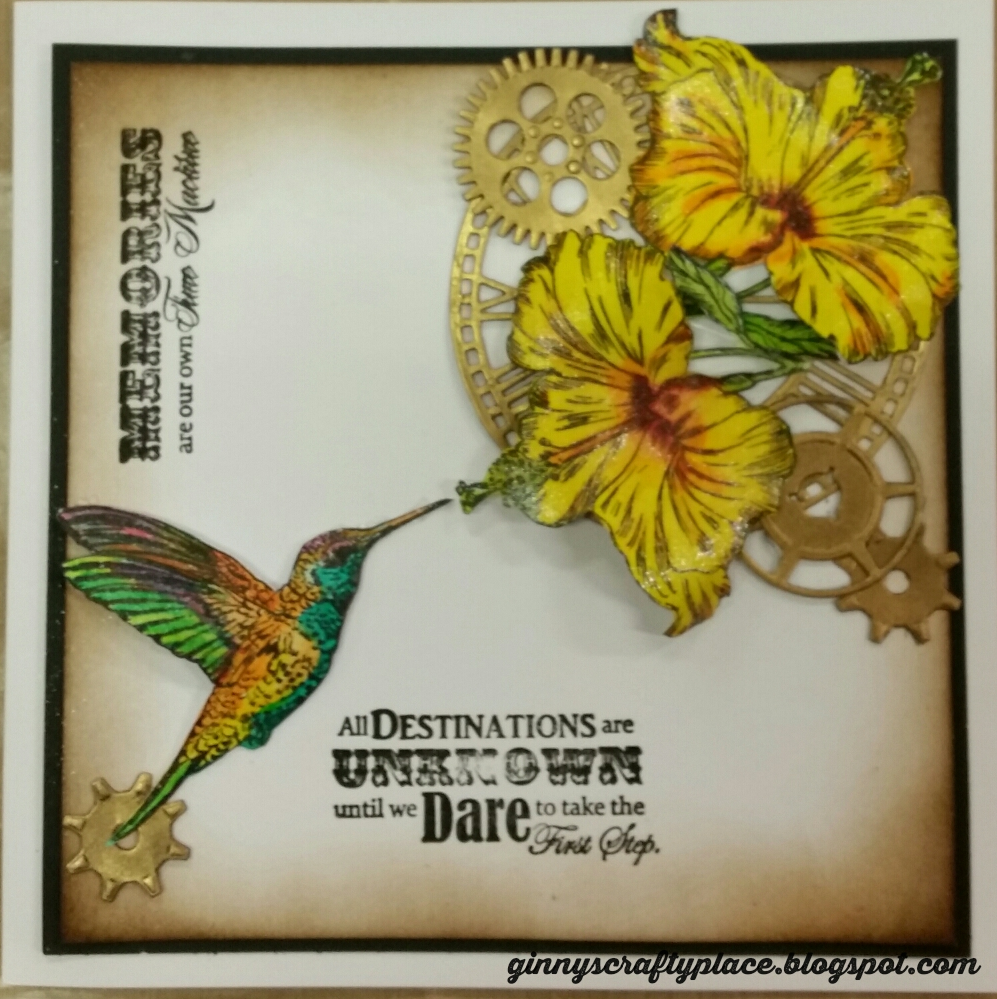
Tropical Nectar

Well today I got to spend the day with Sheena Douglas and Donna Ratcliff - and what a day it was!  I had an amazing time and stepped right outside my comfort zone - I did a canvas and this card, which I absolutely love.

Sadly both Sheena and Donna were both poorly with a nasty virus, so really hope they recover soon and they did admirably to get through the day.

We started by stamping and colouring the different elements of the card - the cogs, humming bird and flowers - using the aqua tints and gilding wax, before fussy cutting them out (except for the cogs which were done with dies thank goodness!)


We then arranged the card to our liking and before sticking it down, to ensure we were happy with the layout.  The cogs behind the flowers and bird really give the card a little more depth.  We used walnut stain distress ink around the outer of the card before layering it up on black matt and placing it on the card.

I have to say that the colours in the Aquatints Brights collection are stunning and I really enjoyed using them and they blend beautifully.

I used a combination a cosmic shimmer dies clear glue and silicone gel to add extra dimension to the bird and flowers.

There were 10 of us on the workshop but every single project we produced looked different.  I will share the canvas we created later in the week, so that will be something to look forward to!

The products used for this card are:

Sheena Douglass Perfect Partners Time Traveller Dies - Make Time & Geared Up
Sheena Douglass A Little Bit Sketchy A6 Stamp Set - Tropical Nectar
Spectrum Noir AquaTint Set - Bright and Beautiful
Spectrum Noir Sparkle Overlay Pen
Pebeo Gilding Wax - King Gold & Renaissance Gold

Anyway, that is all from me for today but I will be back later in the week.

With love and crafty hugs

Ginny xx

Tuesday, 25 October 2016

Beautiful Butterfly

My blog has recently been promoted by the lovely people at SETcraft in Haverfordwest, so if you are visiting as a result of this I would like to extend a warm welcome to you, and invite you to have a good look around my blog and please feel free to leave a comment.  I purchase a lot of my dies from them and they are always really helpful, friendly, efficient and offer excellent value for money!

Well for this evenings post I have used the stunning Sue Wilson butterfly frame which has been cut from white glossy cardstock.  The backing sheet I have used alcohol inks on acetate which gives a really bright and vibrant background, and have to admit that this is becoming one of my favourites!


I decided to use a muted cardstock to use as my mats which I feel tones it down a little and hopefully has struck a bit of a balance!  I have not yet added a sentiment as thought I would do this at a later date, once I decide what I am going to use it for; however I do also like the it quite clean but wander whether it feels like it is missing a little something.  What do you think?


I love the butterfly and this looks really nice layered with the alcohol inks on acetate background, again with the white gloss cardstock.

Alcohol inks are becoming a bit of a favourite of mine, and find myself being pulled towards the really bright colours, so will have to make an effort to try some others! 

For this card I used the following:

Sue Wilson Butterfly Frame
Foundation white glossy cardstock
Foundation periwinkle cardstock
Heat resistant acetate
Alcohol inks - raspberry, sunshine yellow & pool party

That is all for this evening but will be back soon with a monolith that I have been playing with.  I am also attending a workshop with Sheena Douglas this weekend so hopefully will have something exciting to share with you next week!

Until next time, with love and crafty hugs.

Ginny xx


Sunday, 16 October 2016

The world of reality has its limits!


....................... but the world of imagination is boundless!

So this week I have finished off another of my smelly tags!  This was made a few weeks back using the pixie powders with shaving foam and I left it aside until I felt like decorating it - please take a peek here to see the technique.

I used some Carabelle Studio stamps for the foliage and I absolutely adore some of the quotes from Stampers Anonymous, add a bit of black embossing powder and hey presto, this is what you have!

I decided to leave the back of the tag blank so I could use it to write my message.


Items used for this project are:

Black embossing powder
Carabelle Studio Frise en Ribambelle
Carabelle Studio Zinouk du jardin
Stampers Anonymous Stuff to Say
Pixie powders
Shaving foam

Something a little different this week so I hope you have enjoyed it.

With love and crafty hugs

Ginny xx

Sunday, 9 October 2016

Starry Starry Night 2!

Well this is the card I promised you earlier in the week but I am afraid the week ran away with me, so here we are again on Sunday and I still haven't posted it!

So here you go - what do you think.


I decided on this one to put the bow at the top and I think I actually prefer this, as it draws the eye upwards where there is not so much going on.

The items used are exactly the same as my last post, but just as a reminder:

SW Christmas Cottage Scenes die
SW Starry Night Sky die
SW Pierced Rectangle dies
CE Foundation cardstock in pearlescent midnight blue and icicle
Ribbon from my own stash
Cosmic shimmer glue
White glitter

Hopefully I will be sharing something else later in the week.

With crafty hugs and love

Ginny x


Thursday, 6 October 2016

Starry Starry Night

I think this may end up being my batch card for Christmas as absolutely love this combination of dies.  I have used my favourite colour scheme (navy and white!) but think I might have to mix it up a bit as think it would lovely in other colours.


 For this card I cut the starry night sky die out of midnight blue cardstock and the Christmas cottage scene out of the pearlescent icicle cardstock. 

I popped some glue across this die and added some glitter to make it glisten like snow.  These two dies were stacked on top of each other to set the scene.  I added a frame of the icicle cardstock and  placed the card onto a midnight blue background.  To finish off I added a strip of white ribbon and added a bow to it.


For this card I used the following:
SW Christmas Cottage Scenes die
SW Starry Night Sky die
SW Pierced Rectangle dies
CE Foundation cardstock in pearlescent midnight blue and icicle
Ribbon from my own stash
Cosmic shimmer glue
White glitter

I have another very similar card which I will share tomorrow.

Take care and until next time, love and crafty hugs.

Ginny x