Saturday 29 October 2016

Tropical Nectar

Well today I got to spend the day with Sheena Douglas and Donna Ratcliff - and what a day it was!  I had an amazing time and stepped right outside my comfort zone - I did a canvas and this card, which I absolutely love.

Sadly both Sheena and Donna were both poorly with a nasty virus, so really hope they recover soon and they did admirably to get through the day.

We started by stamping and colouring the different elements of the card - the cogs, humming bird and flowers - using the aqua tints and gilding wax, before fussy cutting them out (except for the cogs which were done with dies thank goodness!)


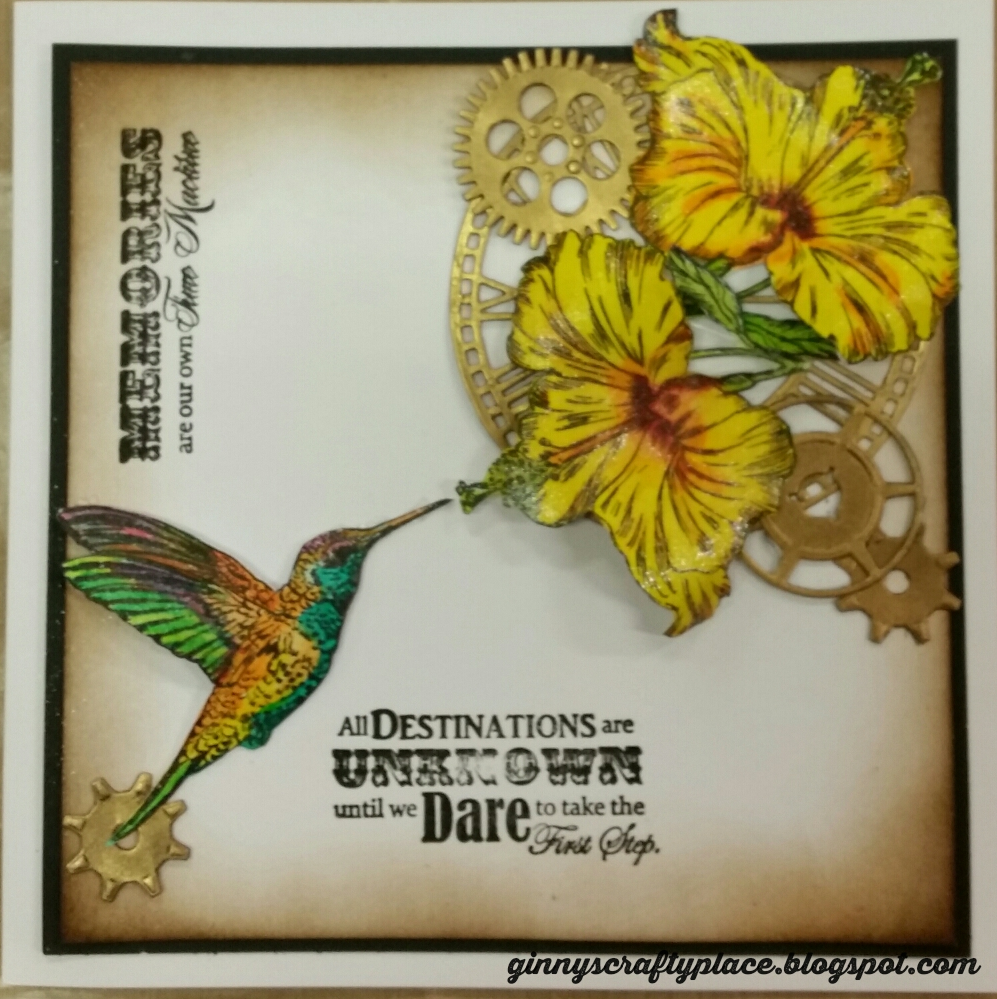
We then arranged the card to our liking and before sticking it down, to ensure we were happy with the layout.  The cogs behind the flowers and bird really give the card a little more depth.  We used walnut stain distress ink around the outer of the card before layering it up on black matt and placing it on the card.

I have to say that the colours in the Aquatints Brights collection are stunning and I really enjoyed using them and they blend beautifully.

I used a combination a cosmic shimmer dies clear glue and silicone gel to add extra dimension to the bird and flowers.

There were 10 of us on the workshop but every single project we produced looked different.  I will share the canvas we created later in the week, so that will be something to look forward to!

The products used for this card are:

Sheena Douglass Perfect Partners Time Traveller Dies - Make Time & Geared Up
Sheena Douglass A Little Bit Sketchy A6 Stamp Set - Tropical Nectar
Spectrum Noir AquaTint Set - Bright and Beautiful
Spectrum Noir Sparkle Overlay Pen
Pebeo Gilding Wax - King Gold & Renaissance Gold

Anyway, that is all from me for today but I will be back later in the week.

With love and crafty hugs

Ginny xx

Tuesday 25 October 2016

Beautiful Butterfly

My blog has recently been promoted by the lovely people at SETcraft in Haverfordwest, so if you are visiting as a result of this I would like to extend a warm welcome to you, and invite you to have a good look around my blog and please feel free to leave a comment.  I purchase a lot of my dies from them and they are always really helpful, friendly, efficient and offer excellent value for money!

Well for this evenings post I have used the stunning Sue Wilson butterfly frame which has been cut from white glossy cardstock.  The backing sheet I have used alcohol inks on acetate which gives a really bright and vibrant background, and have to admit that this is becoming one of my favourites!


I decided to use a muted cardstock to use as my mats which I feel tones it down a little and hopefully has struck a bit of a balance!  I have not yet added a sentiment as thought I would do this at a later date, once I decide what I am going to use it for; however I do also like the it quite clean but wander whether it feels like it is missing a little something.  What do you think?


I love the butterfly and this looks really nice layered with the alcohol inks on acetate background, again with the white gloss cardstock.

Alcohol inks are becoming a bit of a favourite of mine, and find myself being pulled towards the really bright colours, so will have to make an effort to try some others! 

For this card I used the following:

Sue Wilson Butterfly Frame
Foundation white glossy cardstock
Foundation periwinkle cardstock
Heat resistant acetate
Alcohol inks - raspberry, sunshine yellow & pool party

That is all for this evening but will be back soon with a monolith that I have been playing with.  I am also attending a workshop with Sheena Douglas this weekend so hopefully will have something exciting to share with you next week!

Until next time, with love and crafty hugs.

Ginny xx


Sunday 16 October 2016

The world of reality has its limits!


....................... but the world of imagination is boundless!

So this week I have finished off another of my smelly tags!  This was made a few weeks back using the pixie powders with shaving foam and I left it aside until I felt like decorating it - please take a peek here to see the technique.

I used some Carabelle Studio stamps for the foliage and I absolutely adore some of the quotes from Stampers Anonymous, add a bit of black embossing powder and hey presto, this is what you have!

I decided to leave the back of the tag blank so I could use it to write my message.


Items used for this project are:

Black embossing powder
Carabelle Studio Frise en Ribambelle
Carabelle Studio Zinouk du jardin
Stampers Anonymous Stuff to Say
Pixie powders
Shaving foam

Something a little different this week so I hope you have enjoyed it.

With love and crafty hugs

Ginny xx

Sunday 9 October 2016

Starry Starry Night 2!

Well this is the card I promised you earlier in the week but I am afraid the week ran away with me, so here we are again on Sunday and I still haven't posted it!

So here you go - what do you think.


I decided on this one to put the bow at the top and I think I actually prefer this, as it draws the eye upwards where there is not so much going on.

The items used are exactly the same as my last post, but just as a reminder:

SW Christmas Cottage Scenes die
SW Starry Night Sky die
SW Pierced Rectangle dies
CE Foundation cardstock in pearlescent midnight blue and icicle
Ribbon from my own stash
Cosmic shimmer glue
White glitter

Hopefully I will be sharing something else later in the week.

With crafty hugs and love

Ginny x


Thursday 6 October 2016

Starry Starry Night

I think this may end up being my batch card for Christmas as absolutely love this combination of dies.  I have used my favourite colour scheme (navy and white!) but think I might have to mix it up a bit as think it would lovely in other colours.


 For this card I cut the starry night sky die out of midnight blue cardstock and the Christmas cottage scene out of the pearlescent icicle cardstock. 

I popped some glue across this die and added some glitter to make it glisten like snow.  These two dies were stacked on top of each other to set the scene.  I added a frame of the icicle cardstock and  placed the card onto a midnight blue background.  To finish off I added a strip of white ribbon and added a bow to it.


For this card I used the following:
SW Christmas Cottage Scenes die
SW Starry Night Sky die
SW Pierced Rectangle dies
CE Foundation cardstock in pearlescent midnight blue and icicle
Ribbon from my own stash
Cosmic shimmer glue
White glitter

I have another very similar card which I will share tomorrow.

Take care and until next time, love and crafty hugs.

Ginny x

Sunday 2 October 2016

Anniversary Card 2!!!

Well this is the second anniversary card from last week.  This one was for my daughter and son-in-law for there 7th wedding anniversary.  She really isn't a girly girl and likes her fairies, so decided to mix it up a bit but tried to keep it in a fairly classic style. I did manage to get some ribbon in there even if it wasn't a bow! I also needed to post it so couldn't have too many layers in it.

I think this card would look good in almost any combination of colours  I hope you will agree that it is simple but effective.

Anyway, here goes:


For this card I used the following

Celtic Dreams Hide Away die
Foundation Cardstock - Amethyst, Iris & White
Sue Wilson Pierced Circles
Sue Wilson Pierced Rectangles
Die'Sire Only Words die
Ribbon from my stash

My daughter really liked her card and I hope you do too.

Until next time

With love and crafty hugs

Ginny x